How to use sqlmap to hack a website through SQL Injection!
Disclaimer: This article is only for educational purposes, please only perform this penetration test on the site you are authorized to pen test.
I know this method has been discussed alot many times already on many blogs and sites, but still I would want to explain it a little differently. Tools or softwares that you need to perform this tests are listed below:
- Kali Linux
- sqlmap (Already installed in Kali Linux)
- Burp Proxy (Already installed in Kali Linux)
Use Burp Proxy to Intercept HTTP Traffic!
If you have Kali linux installed in Virtual machine or your computer, than most probably sqlmap and Burp proxy will be there.
Step 1: Identify your arguments (Get)
First you need to find arguments against which you are going to perform these tests, if a website is using GET method to send arguments across pages, than it would be really easy to find these arguments.
Open a website in your browser (On which you are going to perform this test), you need to find some forms on the website like :
- Login Forms
- Registration Forms
- .. or any other kind of forms, that send data to back end data base.
Once you found the page with the form, fill the form with randon data and click ‘submit’, once you click submit you will be redirected to another page with url something like this:
http://www.example.org/test.php?username=cyberpersons
Here the argument is “username” and we are passing “cyberpersons” as a data to this argument, once you have identified this argument you are ready to perform test against this url.
Step 2: Perform the test on Get arguments
Open the terminal in kali linux and run the following command:
sqlmap -u http://www.example.org/register.php?username=cyberpersons --threads=3 --dbs
sqlmap will then run and try to find vulnerabilities, if their are any, it will print them out on the screen and ask you to perform the injection on the site. If website only supports data transfer through “GET” than you are done here, if not than you can move forward.
Step 3: Identify POST Arguments!
Identifying arguments in the POST request is bit tricky, since arguments are not appended to the url, instead they are passed in the HTML body. You will need a proxy to identify post arguments. We can use Burp proxy which is a very nice and clean tool that can do the job. If you are using burp proxy on your computer than a setup is bit different, if proxy is configured on a virtual machine than its a bit different too, let see if its installed on your computer.
Burp on local Computer:
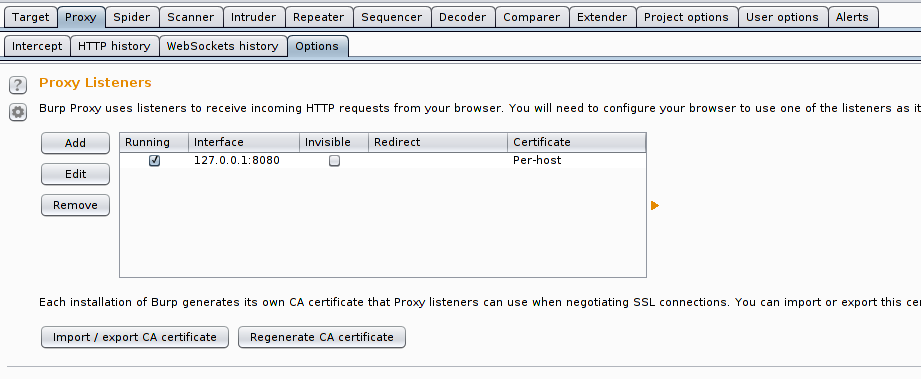
Open Burp > Proxy > Options, and than make sure your settings looks exactly like they are in the above screen shot. Once done you are ready to configure your browser to use proxy, your proxy credentials will be:
- Host: localhost
- Port : 8080
- Click here to read how you can configure your browser to use proxy.
Burp on virtual machine
If you have burp installed on virtual machine, than you first need to make some adjustments before you can start using it.
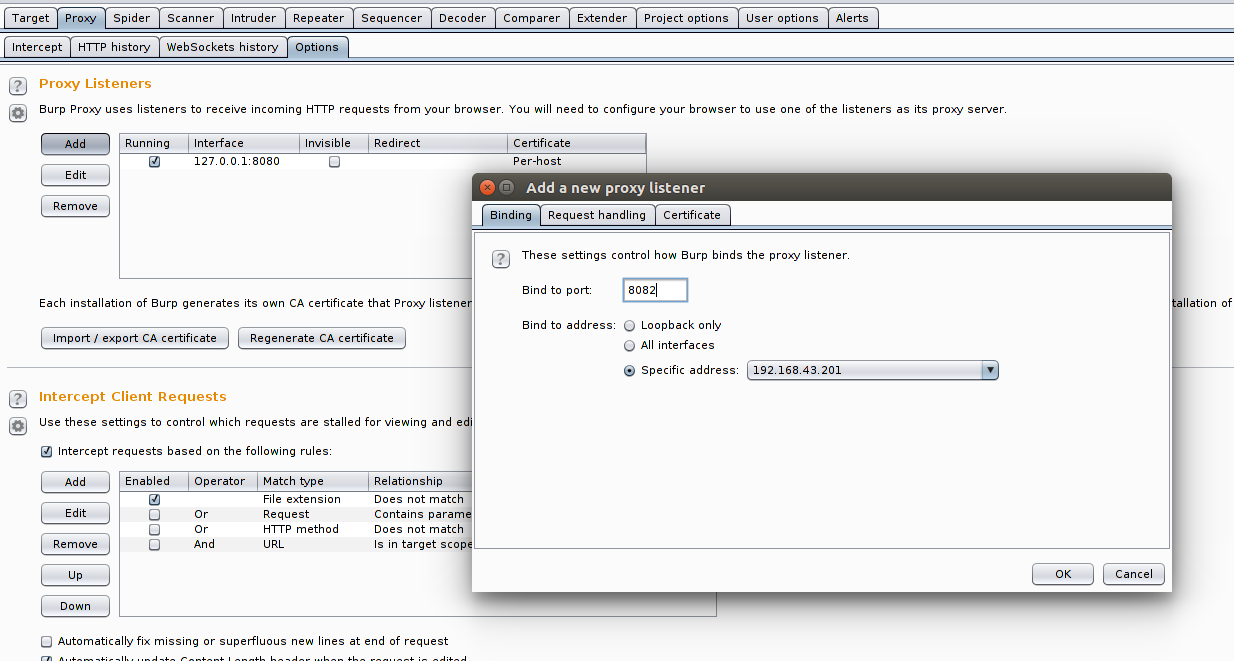
Go to Proxy -> Options -> Click “Add” -> Enter port 8082 -> Select Specific address (And select interface on which you have Internet access on virtual machine) -> Click OK. Now you can use following details to configure proxy in your browser.
- Host: 192.168.43.201 (Please enter the IP of your virtual machine on which proxy is listening)
- Port : 8082
- Click here to read how you can configure your browser to use proxy.
Now open your target site in the browser, and fill the form which use the method “POST”. After filling and submitting the form, come back to Burp Proxy and find the request where you have submitted the form data. Your required request will look something like this:
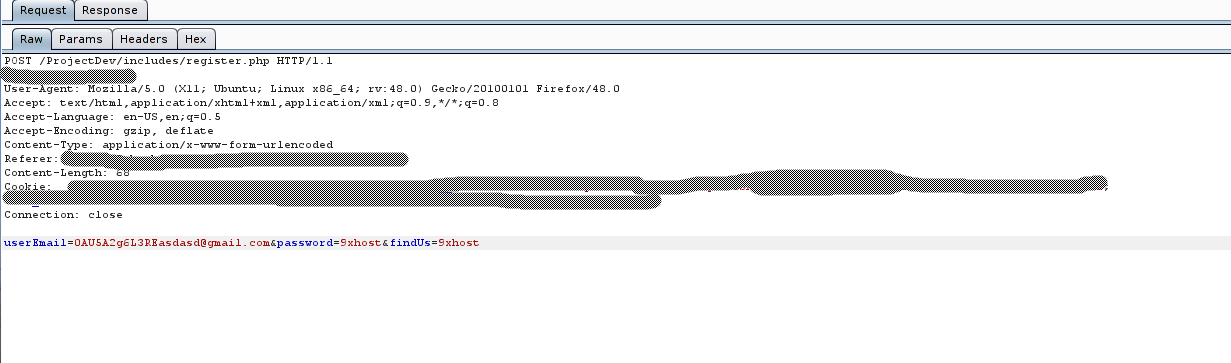
As you can see html body contains following arguments:
[email protected]&password=9xhost&findUs=9xhost
You will need to copy this complete request and copy it in a text file. You will need a location of this file in your command to perform your test, so copy the location of this file, now come back to kali linux terminal and run the following command
# postreq.data is the file that contains the copied POST request from burp
# proxy, you can name this file postreq.txt, it will not make any change.
# Just make sure you know its exact location

sqlmap -r postreq.data --threads=5 --dbs

# postreq.data resides in the same directory so I've not added anything in
# the path, if it resides in some other directory make sure to add complete
# path like /usr/local/postreq.data
After running this command, it will performs the test and will let you know if its vulnerable. Your output screen will look something like this:

That’s how you know that your web application is vulnerable to sql injection attack.