How to install and Configure cPanel/WHM!
Installing cPanel/WHM is fairly easy, you can install cPanel/WHM with only one command. However, in this article, we will discuss how we can first install cPanel/WHM and then perform the after-install steps so that we can get the maximum out of our dedicated server or VPS.
Some important things we need to decide which options to keep and which one not to, how to set security measures and more. Let see how we can do that.
Step 1: Install cPanel/WHM
As I’ve already mentioned above, installation is easy. You just need to have ssh access to your virtual/dedicated server to install cPanel/WHM. First, let us set the hostname because if you won’t set the hostname WHM installation won’t continue. Use the command below to set hostname:
hostname cyber.cyberpersons.com
This will set the hostname to “cyber.cyberpersons.com”
You can then use the command below to start WHM installation.
cd /home && curl -o latest -L https://securedownloads.cpanel.net/latest && sh latest
It will then take some time, depending upon your network and server speed to complete the installation.
Step 2: Configure WHM
You are not done once the installation is complete from SSH. Next step is configuring WHM from their GUI panel. You can access the GUI panel after installation at:
https://<ip address>:2087
Provide username and password to log in.
Page 1:
Once logged in, you will see the first screen:
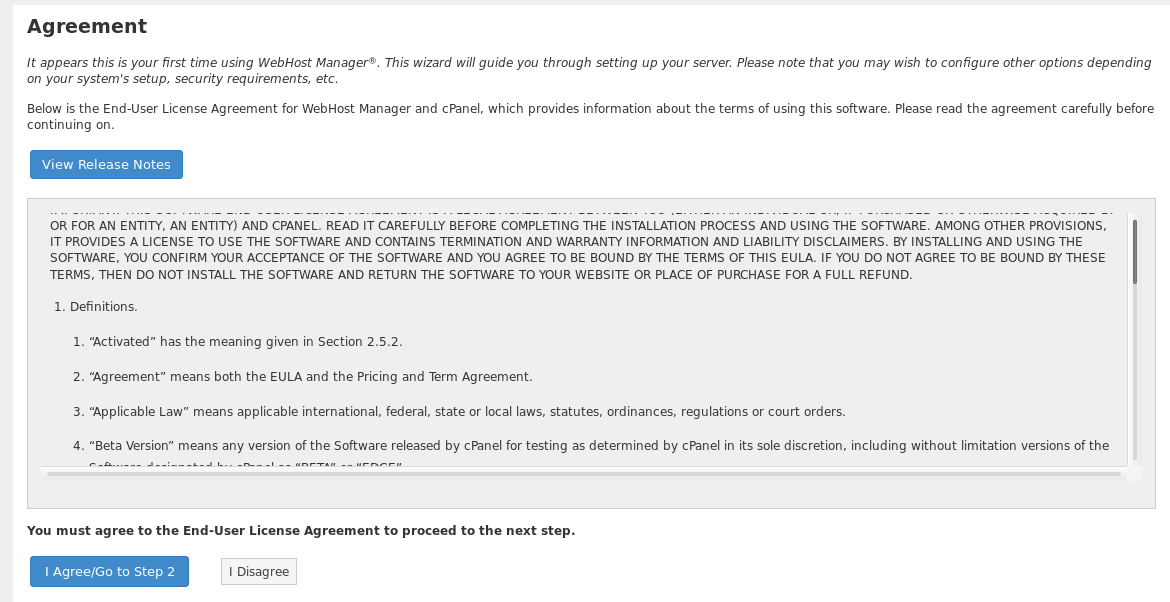
Click “I Agree/Go to Step 2”.
Page 2:

The window above have several options, I will fill them all below as required:
- Server Contact Email Address: [email protected] (You can use your own desired email)
- Server Contact SMS Address: Leave it empty or enter your phone number.
- Server Contact AIM Name: Leave it unchecked.
- Server Contact ICQ Number: Leave it unchecked.
- This Server’s Hostname: cyber.cyberpersons.com
- Primary Resolver: 8.8.8.8
- Secondary Resolver: 8.8.4.4
- Third Resolve: Leave it Empty.
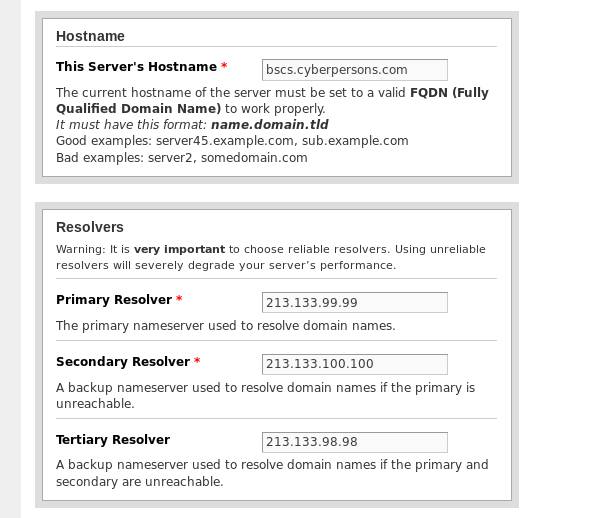
For the “Main Network Interface” the default interface of your machine will be selected, in my case, it was “eth0”.
After filling all these details on page 2, just click “Save and go to step 3”.
Page 3
Page 3 is about adding more IPs to WHM, IPs can be used to assign to each cPanel account. But that is the topic of another day. We can add IPs later as well, so we will just skip.
Page 4:

Page 4 is about name servers, if you are going to host only a few sites and their DNS is not managed by the server then this page is not very important. However, normally it’s good to fill this page because it can become useful later.
The default selection is bind, just keep it that way. If you don’t need name server then select disabled at the bottom of the list.
Our next settings on this page are very important. If you choose bind on the last option, you then have to specify name servers which will be used by internet user to find your server on the internet.
Let us discuss all the numbered steps in the image above.
- You can use “ns1” followed by your domain name, or “dns1” followed by your domain name, and fill the “Nameserver 1” box.
- Same applies to “Nameserver 2”.
- Check the “Configure Address Records for Nameservers”.
- Enter your server main IP address.
- Check “Add “A Entries” for Hostname” box.
- Enter the server main IP address.
After filling all these details you are ready to move to page 5, but before that, you have to register these name servers on your domain registrar as well.
I’ve written a guide on setting up private nameservers at:
cPanel Alternative: VestCP! Complete guide on how to install and use vesta cp
Skip to Step 2 for name server registration guide.
Afer you register private name servers at domain registrar you can move to page 5.
Page 5:
Page 5 is about setting up FTP services that you may need for your server, leaving everything default on this page would be fine, just click “Save and go to Step 6”.
Page 6:
Page 6 is fairly simple too, you just need to leave defaults as they are.
and then click “Finish Setup Wizard”.
Step 3: Feature Showcase
After you click Finish Setup Wizard on the last screen you will be moved to Feature Showcase screen, there are few important things to be done here.
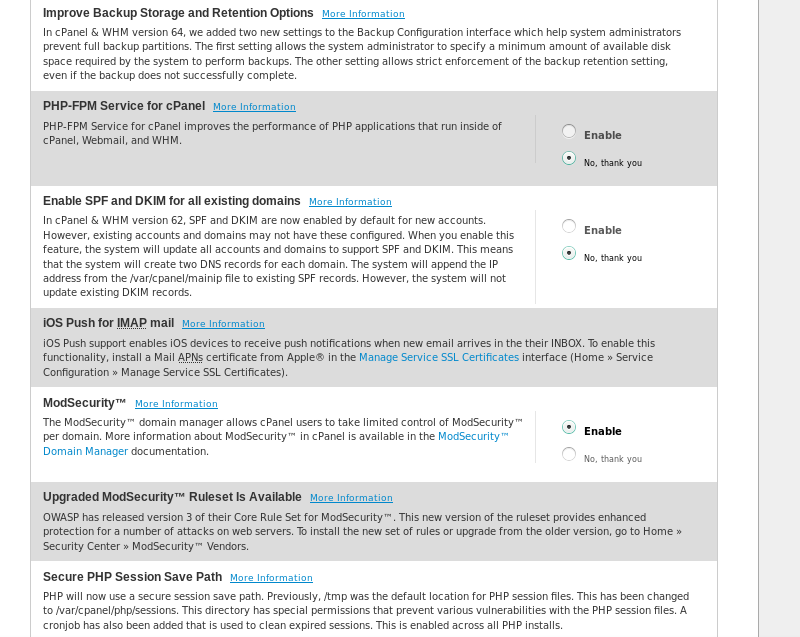
Make sure your settings look like as they are in the image above.
PHP-FPM
Is nothing but a process manager for PHP for better handling of PHP processes, this is a new technology which is now officially integrated into WHM as well, I think you should opt for this option. You can later use it on some sites and not on others. So there is no harm in enabling this option.
ModSecurity
ModSecurity is a web application firewall and it should be activated to prevent against many know web application attacks.
Now you can simply click “Save Settings”
Step 4: Install CSF Firewall!
Your WHM server is already ready to host websites, but it is not a good practice to put your machine ins production unless you have already taken security measures into considerations. So let us install CSF Firewall, open your ssh terminal and run the commands below:
cd /usr/src rm -fv csf.tgz wget https://download.configserver.com/csf.tgz tar -xzf csf.tgz cd csf sh install.sh
cd /usr/src
rm -fv csf.tgz
wget https://download.configserver.com/csf.tgz
tar -xzf csf.tgz
cd csf
sh install.sh
This will install and configure the firewall on your machine, but we will have to enable it from WHM GUI panel.
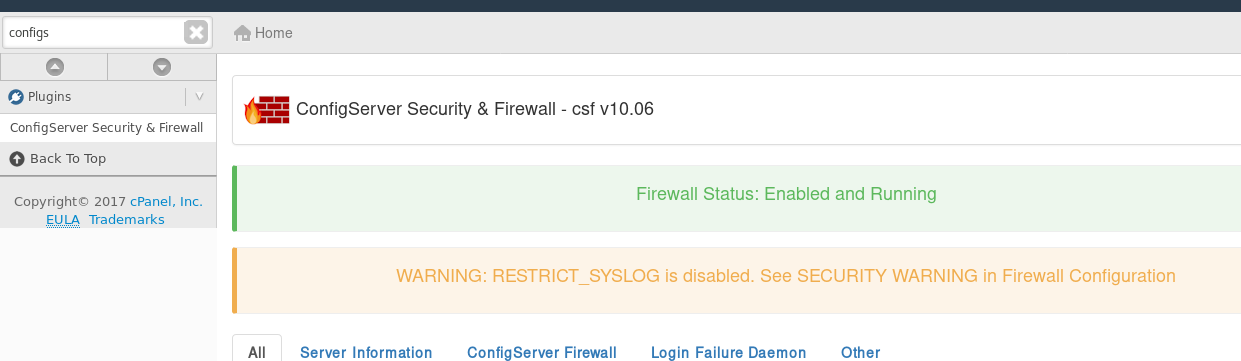
- Step 1 is to search for your newly installed firewall plugin in the search bar.
- Click on “ConfigServer Security & Firewall”.
You can see that firewall is enabled but in test mode, so it is no good in test mode, we’ve to disable the testing mode. Let see how we can disable the testing mode.
- Click ConfigServer Firewall from the menu.
- From the options below, you need to click “Firewall Configuration”.
You will then see something like this:

As you can see Testing is currently on, you can just click Off and click “Change” at the bottom of this window.
Make sure it says “Firewall is enabled and running”, if not you have done something wrong, go above and make sure everything is in order.
Once the firewall is successfully installed and configured we are ready to configure ModSecurity.
Step 5: Configure ModSecurity
ModSecurity is a web application firewall, which now comes bundled with WHM installation by default. All you need to do is to enable and install some vendors for it to start working.
Similarly, search for ModSecurity in the search bar, and click ModSecurity Vendors. On the Vendors windows just click install, and it will install the OWASP ModSecurity Core Rule Set which comes free with WHM.
Comodo ModSecurity Rules
Apart from OWASP, comodo also provide some free ModSecurity rules, you can add comodo as a vendor by clicking “Add Vendor”. You will see the following window:
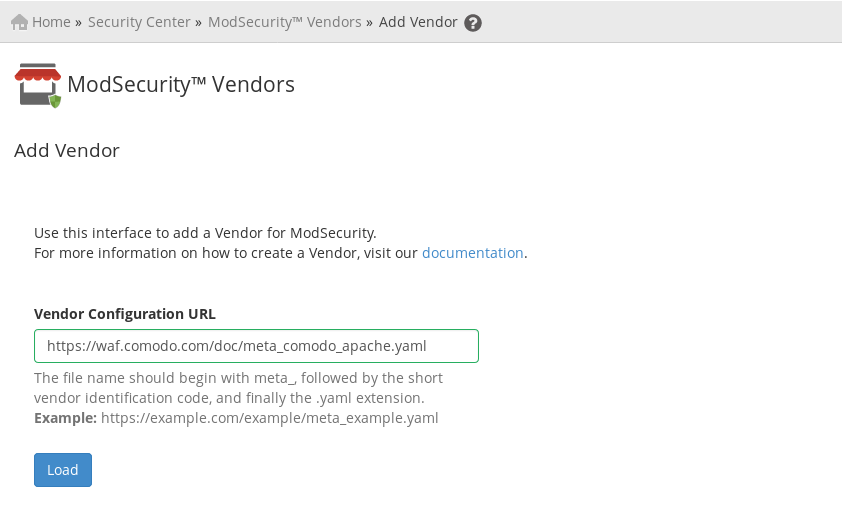
Now in the Vendor Configuration URL, please paste the following link: https://waf.comodo.com/doc/meta_comodo_apache.yaml
and click “Load”. It will then load this vendor like:
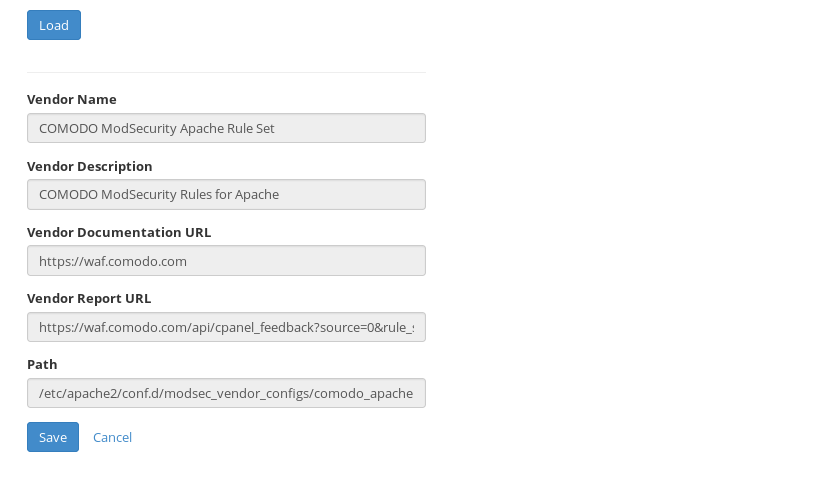
Click “Save” and you have successfully added two vendors. It is time we enable ModSecurity engine to let it process the rules that we’ve just added.
Click ModSecurity Configuration from the menu.
- Audit Log Level: Only log noteworthy transactions, it will log the transactions triggered by the ModSecurity rules. If you need to save all transactions, select “Log all transactions.” and it will then log all HTTP transactions to your server. It is better to save only noteworthy transactions, otherwise, your log file may end up eating all the disk space.
- Connection Engine: Process the rules.
- Rules Engine: Process the rules.
After making these changes click “Save” at the bottom of the window. You have now some standard security implemented on your server.
Step 6: AutoSSL
AutoSSL is one of the recent features of WHM, as you know SSL is really important these days especially for e-commerce sites, or websites who store user information. Well, now cPanel have made it really easy for you to add SSL to any account created in the WHM.
Search for AutoSSL in the search bar, by default AutoSSL is enabled as you can see in the picture above. However, if it is not enabled by default you can enable it by choosing the default cPanel provider and click save. Once enabled you can use “Manage Users” tab to assign SSLs to cPanel accounts.
Click “Manage Users” and check the list to enable SSL for all accounts and then click “Enable AutoSSL on selected User”. It will then take some time to enable SSL.
Conclusion
This guide is a must read guide for anyone who is setting up WHM for the first time, or need some help setting up WHM properly. We’ve discussed initial WHM configurations and then some security measures, however, we’ve not yet discussed the optimizations that we need to do for better performance. If you have only a few sites you might not even need optimizations, but if you run a very busy site, then you need to think about optimizations as well, we will discuss optimizations in a seprate article.
Feel free to let us know if you have any questions in the comment box below.